1. API自动化文档
自动化文档一直是我梦想中的一个功能,这次借着公司的项目终于实现了出来,我说过 beego 不仅仅要让开发 API 快,而且让使用 API 的用户也能快速的使用我们开发的 API,这个就是我开发这个项目的初衷。好了,赶紧动手实践一把吧,首先 bee api beeapi 新建一个 API 应用做起来吧。
2. API 全局设置
必须设置在 routers/router.go 中,文件的注释,最顶部:
// @APIVersion 1.0.0
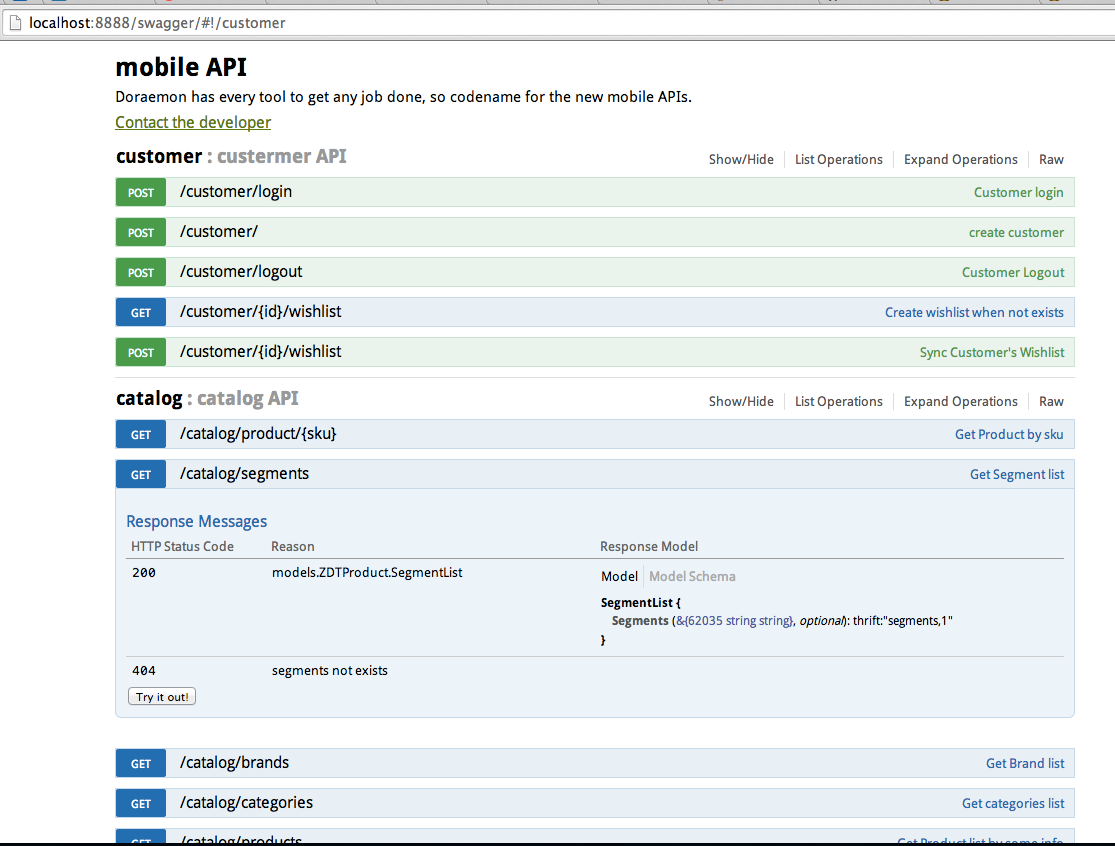
// @Title mobile API
// @Description mobile has every tool to get any job done, so codename for the new mobile APIs.
// @Contact astaxie@gmail.com
package routers
全局的注释如上所示,是显示给全局应用的设置信息,有如下这些设置
- @APIVersion
- @Title
- @Description
- @Contact
- @TermsOfServiceUrl
- @License
- @LicenseUrl
2.1. 路由解析须知
目前自动化文档只支持如下的写法的解析,其他写法函数不会自动解析,即 namespace+Include 的写法,而且只支持二级解析,一级版本号,二级分别表示应用模块
func init() {
    ns :=
        beego.NewNamespace("/v1",
            beego.NSNamespace("/customer",
                beego.NSInclude(
                    &controllers.CustomerController{},
                    &controllers.CustomerCookieCheckerController{},
                ),
            ),
            beego.NSNamespace("/catalog",
                beego.NSInclude(
                    &controllers.CatalogController{},
                ),
            ),
            beego.NSNamespace("/newsletter",
                beego.NSInclude(
                    &controllers.NewsLetterController{},
                ),
            ),
            beego.NSNamespace("/cms",
                beego.NSInclude(
                    &controllers.CMSController{},
                ),
            ),
            beego.NSNamespace("/suggest",
                beego.NSInclude(
                    &controllers.SearchController{},
                ),
            ),
        )
    beego.AddNamespace(ns)
}
2.2. 应用注释
接下来就是我们最重要的注释了,就是我们定义的,我们先来看一个例子:
package controllers

import "github.com/astaxie/beego"

// CMS API
type CMSController struct {
    beego.Controller
}

func (c *CMSController) URLMapping() {
    c.Mapping("StaticBlock", c.StaticBlock)
    c.Mapping("Product", c.Product)
}

// @Title getStaticBlock
// @Description get all the staticblock by key
// @Param    key        path     string    true        "The email for login"
// @Success 200 {object} models.ZDTCustomer.Customer
// @Failure 400 Invalid email supplied
// @Failure 404 User not found
// @router /staticblock/:key [get]
func (c *CMSController) StaticBlock() {

}

// @Title Get Product list
// @Description Get Product list by some info
// @Success 200 {object} models.ZDTProduct.ProductList
// @Param    category_id        query    int    false        "category id"
// @Param    brand_id    query    int    false        "brand id"
// @Param    query    query    string     false        "query of search"
// @Param    segment    query    string     false        "segment"
// @Param    sort     query    string     false        "sort option"
// @Param    dir     query    string     false        "direction asc or desc"
// @Param    offset     query    int        false        "offset"
// @Param    limit     query    int        false        "count limit"
// @Param    price             query    float        false        "price"
// @Param    special_price     query    bool        false        "whether this is special price"
// @Param    size             query    string        false        "size filter"
// @Param    color             query    string        false        "color filter"
// @Param    format             query    bool        false        "choose return format"
// @Failure 400 no enough input
// @Failure 500 get products common error
// @router /products [get]
func (c *CMSController) Product() {

}
首先是 CMSController 定义上面的注释,这个是用来显示这个模块的作用。接下来就是每一个函数上面的注释,这里列出来支持的各种注释:
@Title
这个 API 所表达的含义,是一个文本,空格之后的内容全部解析为 title
@Description
这个 API 详细的描述,是一个文本,空格之后的内容全部解析为 Description
@Param
参数,表示需要传递到服务器端的参数,有五列参数,使用空格或者 tab 分割,五个分别表示的含义如下
- 参数名
- 参数类型,可以有的值是 formData、query、path、body、header,formData 表示是 post 请求的数据,query 表示带在 url 之后的参数,path 表示请求路径上得参数,例如上面例子里面的 key,body 表示是一个 raw 数据请求,header 表示带在 header 信息中得参数。
- 参数类型
- 是否必须
- 注释
@Success
成功返回给客户端的信息,三个参数,第一个是 status code。第二个参数是返回的类型,必须使用 {} 包含,第三个是返回的对象或者字符串信息,如果是 {object} 类型,那么 bee 工具在生成 docs 的时候会扫描对应的对象,这里填写的是想对你项目的目录名和对象,例如
models.ZDTProduct.ProductList就表示/models/ZDTProduct目录下的ProductList对象。三个参数必须通过空格分隔
@Failure
失败返回的信息,包含两个参数,使用空格分隔,第一个表示 status code,第二个表示错误信息
@router
路由信息,包含两个参数,使用空格分隔,第一个是请求的路由地址,支持正则和自定义路由,和之前的路由规则一样,第二个参数是支持的请求方法,放在
[]之中,如果有多个方法,那么使用,分隔。
2.3. 如何自动化生成文档
要使得文档工作,你需要做几个事情,
- 第一开启应用内文档开关,在配置文件中设置:
EnableDocs = true, - 然后在你的
main.go函数中引入_ "beeapi/docs"(beego 1.7.0 之后版本不需要添加该引用)。 - 这样你就已经内置了 docs 在你的 API 应用中,然后你就使用
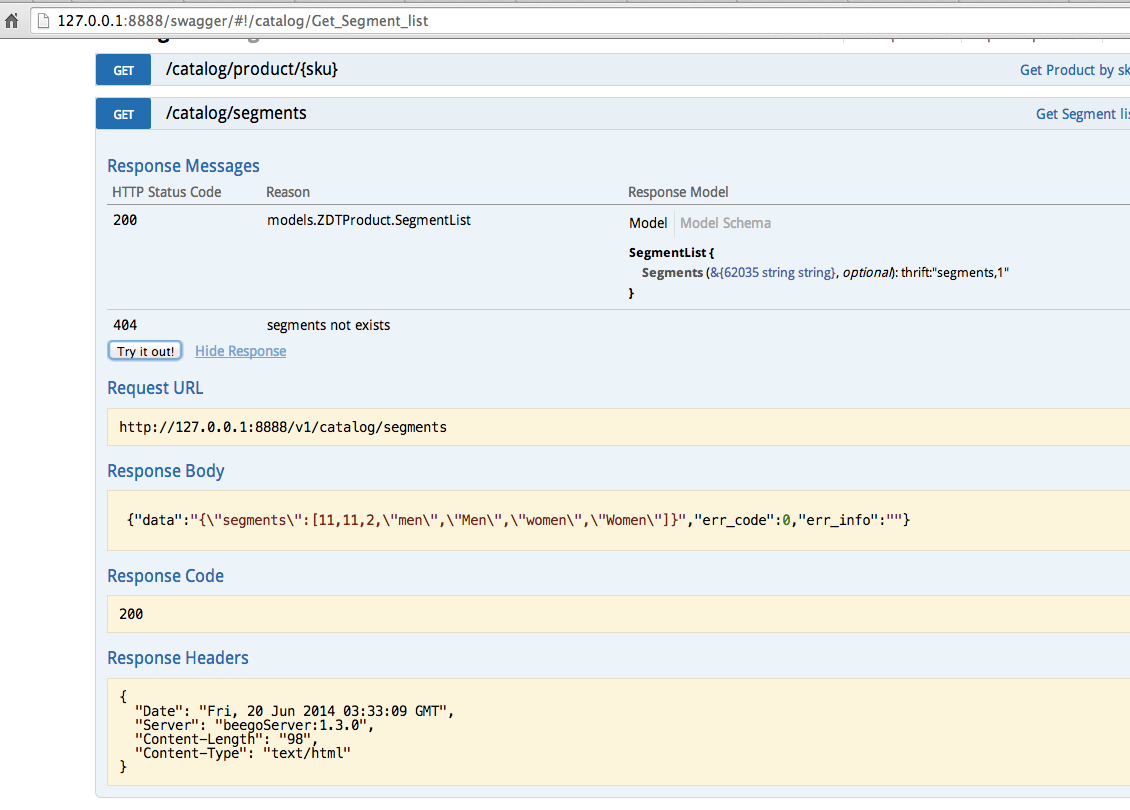
bee run -gendoc=true -downdoc=true,让我们的 API 应用跑起来,-gendoc=true表示每次自动化的 build 文档,-downdoc=true就会自动的下载 swagger 文档查看器
好了,现在打开你的浏览器查看一下效果,是不是已经完美了。下面是我的 API 文档效果:
2.4. 可能遇到的问题
CORS 两种解决方案:
把 swagger 集成到应用中,下载请到swagger,然后放在项目目录下:
  if beego.BConfig.RunMode == "dev" {
      beego.BConfig.WebConfig.DirectoryIndex = true
      beego.BConfig.WebConfig.StaticDir["/swagger"] = "swagger"
  }
API 增加 CORS 支持
ctx.Output.Header("Access-Control-Allow-Origin", "*")
未知错误,因为这是我自己项目中使用的,所以可能大家在写的过程中会遇到一些莫名的错误,请提 issue 去吧!